

Fifteen months. Nearly FIFTEEN months after receiving an antique dining room table set from a friend who was moving and didn’t have the space or time to invest in refinishing it, I am finally recapping The Big Reveal. Against all odds, and they were some pretty hefty ones after I got my inexperienced hands on it, its finally getting its happily ever after.
Most people would try refinishing an old thrift store dresser or bedside table for their first project. But no, not me. Antique table and six chairs? Heck yeah I’ll take it. You can google your way through anything these days, am I right? How quickly I’d be brought down to the realities of the refinishing world and learn the hard truth that there are no true instructions for how to do this mess, just very loose “this might happen if you’re lucky”-type guides.
 Just how green was I when this journey began? Like, new shoot with no leaves yet green. I’d recently learned how to use power tools in order to make a cedar table from a fallen tree on my grandparent’s land (I’m sentimental like that), which spurred Hubs to try his hand at making a piece for our TV to sit on and somehow THAT caused my friend to think we’d be able to do something with her table (little did we know that our minimal woodworking experience would have ZERO relevance to refinishing pieces). But since she just needed to find it a new home and wasn’t actually commissioning us to redo it for her, there was no pressure for us to do a perfect job. However, it also…well…removed any pressure to get it DONE. Maybe we’d sell it? Maybe we’d find a place to store it in case we ever bought a vacation home (ha, laugh away). There was nothing spurring us to complete it other than wondering if we COULD and that combined with my MANY mistakes along the way led us to just be getting here a full 15 months later. But alas, it is done.
Quick jaunt down memory lane (or the project in a nutshell if you haven’t had the pleasure of reading my previous ramblings – which are linked below for your convenience):
1920’s Dining Room Table – Part 1
1920’s Dining Room Table – Part 2
1920’s Dining Room Table – Part 3: Finishing Fails
3 Crazy Easy Steps to Reupholstering a Dining Room Chair
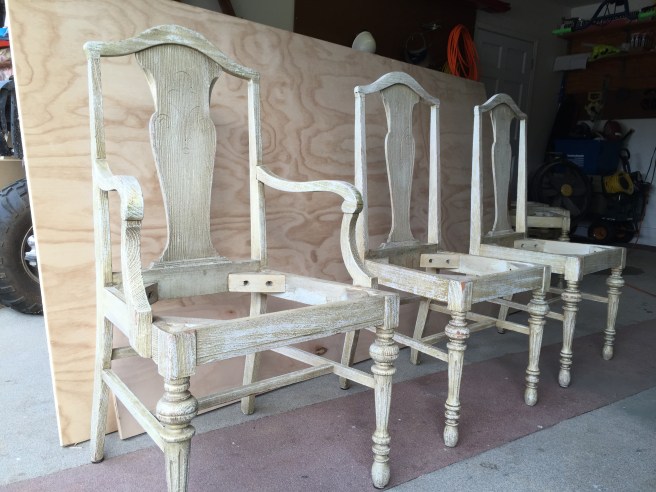
State of the Set When We Received Them
Even with the layers upon layers of paint and various finishes, the table and chairs were beautiful. Compared to today’s furniture, the set looked almost dainty with just the right amount of details. 

Sand, Paint, Oops, Repeat
There were SOOOOoooo many points during this process that I wanted to quit. Hand-sanding those chairs with all the tiny grooves and crevices was NOT my favorite thing to do. I’d get to going back and forth with that sanding block and then knock the JUNK out of my fingers. And my BACK from hunching over! Mad props to the people who do this all the time. I felt like I’d been run over by a semi by the time I’d roughed them all up.
 Then of course I got the first couple of chairs painted and decided I didn’t like them even though I’d followed the blog post instructions I’d found to a tee. Too shiny, too dark. I think the white primer got my eyes used to seeing the whole thing brighter/cleaner. I debated the wisdom of going off-script when I had absolutely zero knowledge of what I was doing. But in the end it came down to either sanding those two chairs back down (ugh), or continuing to paint the other 4 chairs and the table in a paint that I already knew I didn’t like (bigger ugh). Off-script it was.
Fabric Detour
The most fun part of this whole project to me was taking the fabric off the chairs. Sounds weird, right? But I LOVE history and to my delight, instead of removing the existing fabric each time the previous owners reupholstered the chairs, they simply added the new layers. It was like peeling back the decades, from staples back to tiny square-topped nails and all. 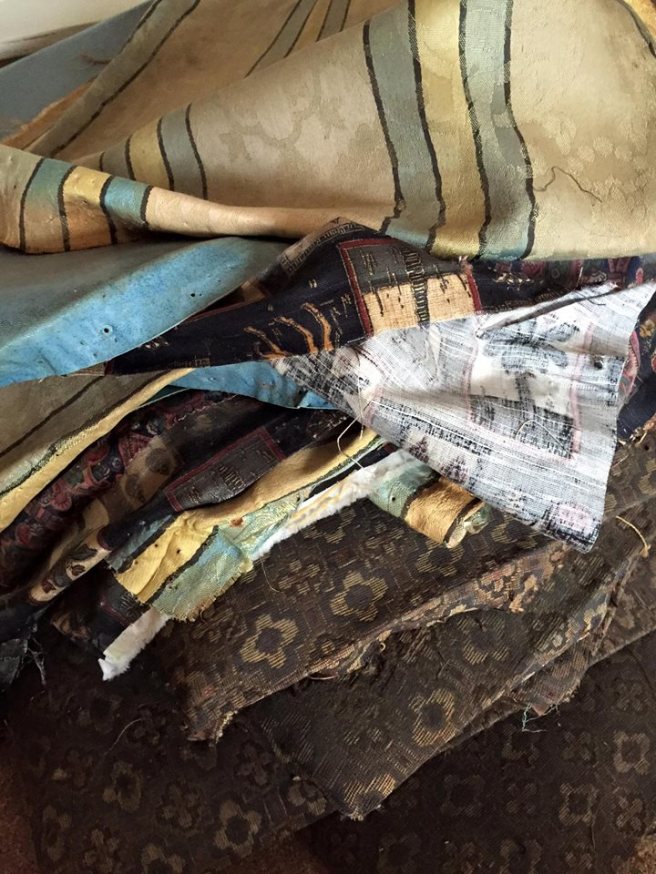
SUCCESS, almost
 When the gray paint turned out to be a bust, I decided to grab whatever we already had in the garage that was almost white and run with it. I found an article that used white paint and a dark wax to create an antiqued look. Again, y’all. Don’t let the step-by-step aspect of these articles fool you. Ya got about a 50/50 shot of it coming out anything similar to the picture you’re trying to copy…. I did two chairs. The dark wax tinted the chairs slightly orange but at this point sanding them back down was the last thing I wanted to do so I just left them and moved on. I found yet another post where a girl used clear wax, glaze, and baby wipes. Why not, right? Lo and behold, I got a look I could live with using that technique on the other four chairs (and maybe nobody would notice the two that looked like they had an unfortunate run-in with self-tanner).
Things were looking up. I even had success trying my hand at recovering the chairs (although my first experience in a fabric store still haunts me…).
And then it was time for the table. I hand-painted a few coats onto it with a brush, gave it a good layer of clear wax, and then ruined it. *sigh* Heads up: glaze and stain are NOT interchangeable. There’s really no excuse. The cans don’t even look the same. But in my defense, a lot of time had gone by between completing the chairs and finally circling back around to do the table (full-time job, kiddos, life, etc). I guess I was feeling a little too comfortable from my eventual success with the chairs to slow down enough to double check what I was doing. 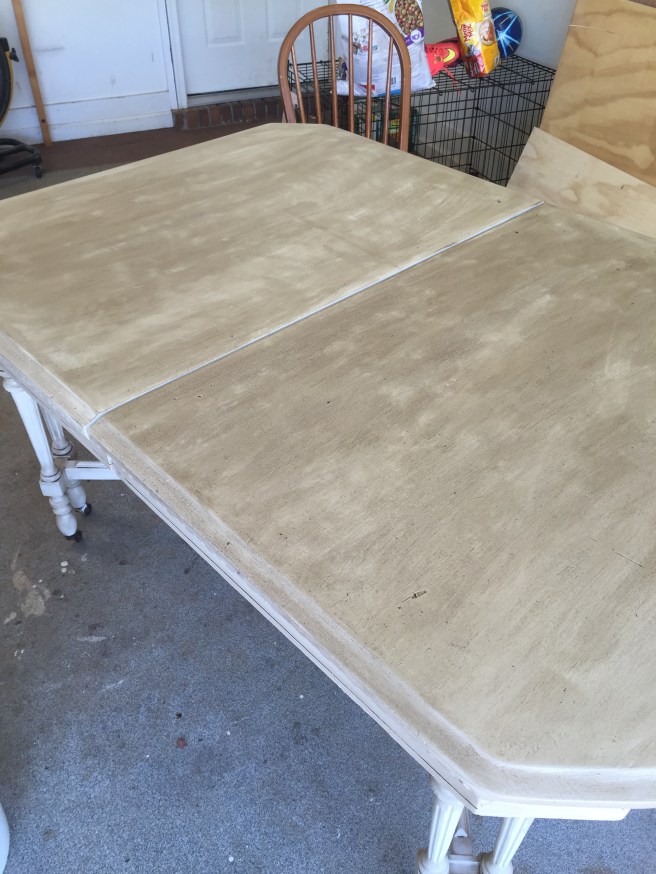
ANYhoo, it was bad. I cried. I gave up. I no longer cared about this project and the fact that I’d so arrogantly started a blog for the sole purpose of documenting the process. In fact, it was Hubs who came to the rescue, sanded off the majority of my ugly, brought out the big guns (his paint-sprayer) to add a fresh coat of pretty white paint, and even went as far as to spray it with poly (well, most of it anyway; the can only had enough left to do half the job).
I should’ve known better than to think the story ended there. Somehow the half can of poly and the lack of baby wipes put the project on hold for weeks (we struggle to remember to pick things up at the store on the best of days and the table wasn’t priority uno to begin with). It might’ve been a blessing in disguise though. In the weeks it sat, the sunlight coming through the garage turned the little bit of poly on the table YELLOW. And you know what that meant? It would need to be SANDED OFF. I can’t with the sanding y’all. But I couldn’t move forward with it either. So it sat. And sat some more. And got used as a work table; and a junk collector (flat surface phenomenon, y’all). 
One Last Hurrah
Fortunately, we both get a pretty substantial amount of off days around Christmas each year and decided that come hell or high water the table was getting done before we went back to work. What we’d do with it when we were finished, who the heck knew, but we were getting it out of the garage.
 So guess what we did? We SANDED (and by “we” I mean Brian, obviously (oh, you didn’t know Hubs had a name?). BTW – I actually did try to use his electric hand sander but he said I wasn’t holding it flat and would mess the table up. Hahaha, mess it up, right.) Halfway through him sanding the table top, I yelled for him to stop. You’re never going to believe this, but I liked it. I mean, I really really liked it. Just with the sanding. The colors coming through after all our misadventures were shades of white and neutrals and gave it such a clean, natural look. He looked at me like I’d finally lost it, but promised to try to do the other side about the same and then we hit the sides and legs with the sander to add a little extra “distressing” (which wasn’t hard because it had basically distressed itself with the bikes and backpacks and various other stuff running into it over the weeks).
I LURVED it y’all. He even agreed to move the cedar table into our computer-less computer room (where it could be used as a homework/crafting/extra-seating table) and let us try this one in the kitchen. Even though it looked like it would never fit in the tiny space we had available, we somehow managed to get it through the door and into place. Yes, it’s a little oversized but it’s in there and I.ain’t.movin.it.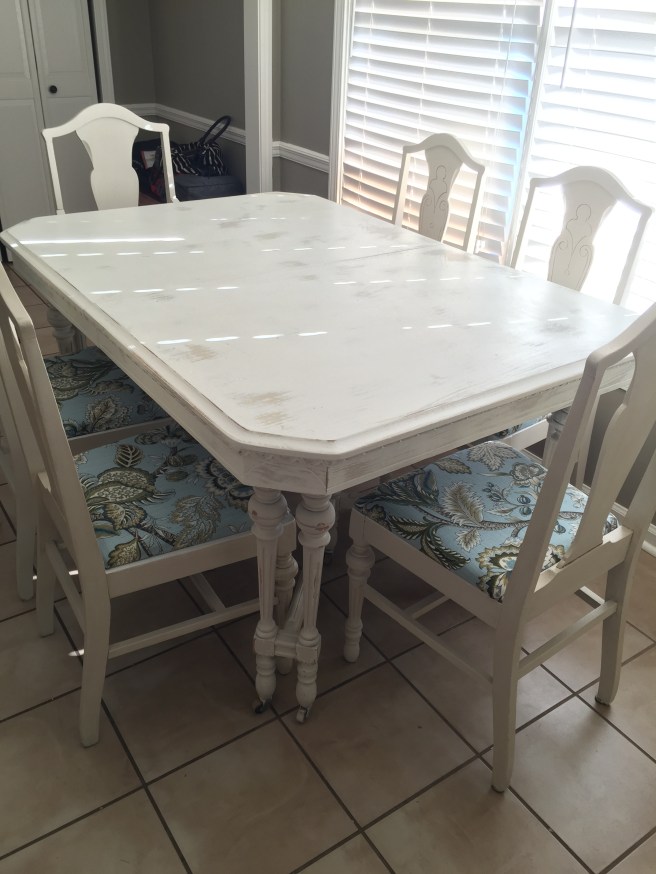
I added a couple layers of wax and LIGHTLY buffed it (I didn’t want it too shiny), bought a new rug (JCPenney), some chargers (Hobby Lobby), and a burlap runner (Target) and finally, FINALLY was able to say DONE. 
So what’s the lesson behind the story? Life doesn’t always turn out like you thought it would. No matter how much you might plan and follow the path you’ve laid out for yourself, sometimes you’ll end up somewhere completely different. Sometimes it’ll feel like the harder you work, the less progress you make. And sometimes? Sometimes what you think of as your biggest mistakes, turn out to be just the layers you didn’t know you needed in order to create something beautiful.
Or maybe refinishing furniture is just a lot harder than it looks.
Until next time,
Jess

Dang I wish you guys could make all of our furniture for us haha
LikeLiked by 1 person
Thank you! It’s always questionable whether or not things will turn out right, but this was a happy little accident:) Be careful what you ask for; we’ll have your entire apartment overflowing!
LikeLiked by 1 person
Wow, that’s what I was exploring for, what a stuff! existing here at
this webpage, thanks admin of this web page.
LikeLike
Do you have any information on the table? I just bought it for $75. It needs completely re-done but was wondering what decade it might be from or the maker and what type of wood it might b. Any information would be great.
LikeLike